Playground Sculptures
Installation Guide (For illustration purposes only)
Playground Sculptures takes no responsibility for installation of our products unless we are requested to install them ourselves. Installation is at your own risk & responsibility.
This is general advice on how to secure Playground Sculptures in place. This is not specific instructions on how to install pieces. Playground Sculptures accepts no liability for any accident or event involving our sculptures once they leave our premises. It is recommended that competent professional persons install Playground Sculptures and you seek professional guidance from a Structural Engineer to design an installation specification and method statement to suit your location, site layout, ground conditions and proposed use, where this is required.
Most Playground Sculptures are installed into soft landscaping such as grass, soil, gravel or bark. For these materials the following sequence could be used:
A minimum of two fit and competent persons are required to install all Playground Sculptures.
1. Safely transport sculptures to proposed location. Wear PPE (gloves, safety boots and safety goggles). Heavy items over 25Kg should be lifted by more than one person or by mechanical lift.
2. Position sculptures on ground to desired position. Heavier sculptures may need a 2nd or 3rd person to hold sculptures in position. Mark position of sculpture or legs of sculpture on ground with spade or marker spray.
3. Remove sculpture to a safe place and rest on clean sheet, sponge or tarpaulin.
4. Dig hole in ground appropriate to the sculpture to be installed.
5. Follow the steps for each type of sculpture listed below, or follow advice of your structural engineer.
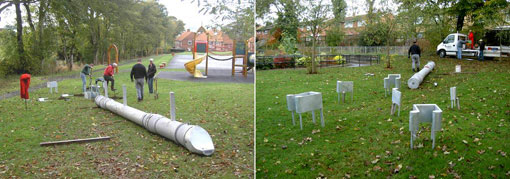
5a. For the Fossil Sculptures and Mini-beast Sculptures it is advised not to exceed the footprint of the sculptures and to dig a square hole for the whole piece to cover or two or more separate holes for the Mini Beast Sculptures, to a minimum depth of 300mm.
In Public Spaces: It is recommended that all Playground Sculptures are set into wet concrete using the supplied M10/M12 bolt fixings provided. All Playground Sculptures cast stone sculptures (except the small and baby ammonites and cast stone leaf stepping stones) come with M10 or M12 threaded socket inserted into the base of the sculptures the supplied M10/M12 steel bars are then used to set the sculptures into wet concrete footings in the ground on installation for a permanent fix.
The giant cast iron ammonite sculpture comes with hidden fixing to screw into the underside so that it can be set into concrete. This piece is heavy at 180Kg so it is advised to install this piece using a mechanical lift. Do not touch or use the sculpture for minimum 7 days to allow the concrete to cure.
In Private Gardens: Playground Sculptures Fossils, Leaf Stepping Stones and Mini-Beast Sculptures are often placed loose into the ground surface. As they are heavy flat backed objects they are quite stable placed in this fashion. Please do not install the sculptures loose if the sculptures are to played upon by children or adults, fix into ground with concrete as above. The above sculptures can also be set into grass, gravel, tarmac or concrete and bedded into concrete or sharp sand/dolomite.
Wall Mounting – Most of our fossil sculptures and some of our leaf stepping stones can be wall mounted using the M10 threaded steel bars fixed into the back of the sculptures. Create a paper or card template with the position of the holes/bars, transfer to the wall and mark wall. Corresponding holes can be drilled into the wall and the sculptures can be permanently fixed with resin anchor. 
5b. For the Toadstool Sculptures it is advised to dig a square hole with a minimum size of 50cm x 50cm x 55cm deep. Stand the toadstool into the hole, one person to hold the sculpture while another fills the hole with wet concrete to a minimum height of 40cm. Compact/vibrate concrete. Place 15cm soil and turf back over the concrete. Add water to turf. Do not touch or use the sculpture for minimum 7 days to allow the concrete to cure.
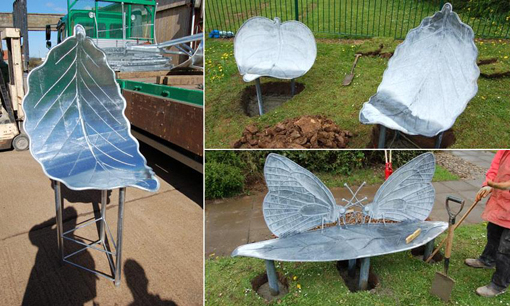
5c. For the Sculpted Seating it is advised to dig a square hole with a minimum size of 50cm x 50cm x 55cm deep around each leg (the leg should stand in the centre of each hole to allow 20cm of concrete all the way round it) . Stand the seat/bench into the hole, check it is at correct height and position in holes, (if not remove from hole and dig out more soil) one person to hold the sculpture while another fills the hole with wet concrete to a minimum height of 40cm. Compact/vibrate concrete. Place 15cm soil and turf back over the concrete. Add water to turf. Do not touch or use the sculpture for minimum 7 days to allow the concrete to cure.
5d. Fruit Sculptures – These sculptures can come with steel rebars fixed into the base to enable the sculptures to be set into wet concrete or with M20/24 stainless steel bar/bars protruding from the base to enable fixing into precast concrete foundations. These sculptures are to be installed by Playground Sculptures or competent professional persons only. Please call to discuss your preferred installation method before ordering your product.
5e. Wildlife Sculptures, Musical Sculptures, Bespoke Designs - These sculptures can come with steel box section legs to enable the sculptures to be set into wet concrete or with steel base plates to anchor to precast concrete foundations. These can be set flush with the ground surface or 15cm below to allow for turf or plants to grow over the concrete. These sculptures are to be installed by Playground Sculptures or competent professional persons only. Please email/call to discuss your preferred installation method before ordering your product.
5f. Wall Designs – Larger designs come in sections and are assembled on site. Small designs come in one piece. Appropriate sized countersunk holes will be drilled through the wall designs to enable the design to be fixed to a wall with wall plugs and screws or resin anchors. Larger designs are to be installed by Playground Sculptures or competent professional persons only. Please call to discuss your preferred installation method before ordering your product.
5g. Stepping Stones (Cast Stone) - Clean any loose or flaking latents (flaking surface) if any, from the back of the stepping stone with a wire brush as this will prevent the concrete bonding. If installing into grass, lay the stones out in the position required, then cut round them into the grass using and old kitchen knife, take out the turf, dig out some more soil (maybe 75mm) add some wet concrete. ,Brush builders PVA onto the back of the stepping stone and set the Stepping Stone down into the wet concrete, pushing it back and forth as it settles into the concrete making it flush with the soil level. The concrete should bulge out from beneath the stepping stone. It usually ends up that the leaf shaped hole is a bit larger than the Stepping stone itself so some concrete squeezes out around the sides of the Stepping Stones locking them in even further. Haunch further concrete around the edge to lock the stepping stone into the concrete. The gap between the Stepping Stones and the grass can be filled back in with top soil and cut pieces of grass.
5h. Leaf Stepping Stones (Cast Iron) come with hidden fixing (as below) and should be installed into wet concrete and oscillated until the cement slurry comes out from under the stone and this should be (ensuring there are no gaps) haunched around the sides of the stepping stone to firmly lock it in place. Otherwise they can be fixed to dry concrete using external tile adhesive.


